While you can always add someone to an outlook calendar, sometimes it can be tedious. For example, if you need to invite multiple people to every event you may need a list of everyone you need to add just to create an hour long meeting. Especially if this calendar is always going to have these specific people it may be beneficial to automate this. Unfortunately, Outlook itself does not have the ability to send an invite to each person when you create an event. I created a process that will do this so I never have to worry about invites! I’ll break down this process into 2 parts: the Power Automate Workflows and a handy SharePoint list. Keep in mind this is best for non-repeating events!
Power Automate
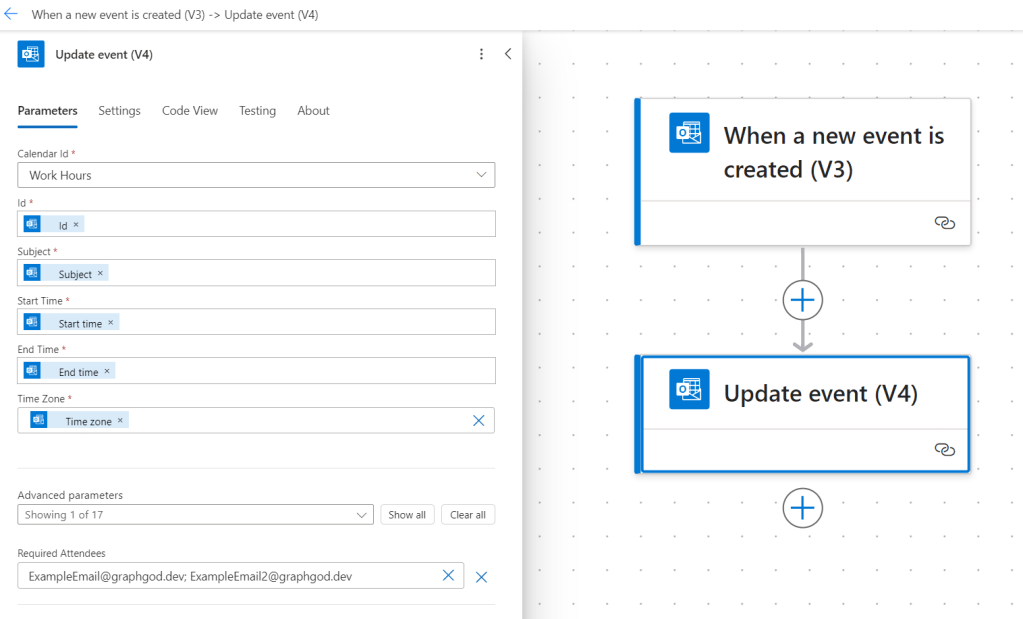
I started this process by creating an automated cloud flow in Power Automate in the My Flows section of Power Automate. I set the trigger to the “When an event is created V3” and created my list. I recommend creating an Outlook calendar for this specifically. If you don’t want a specific calendar set up, you can use a unique identifier such as a special category
Add in all of the parameters under the information provided by the trigger event using the “Insert Expression” and “Dynamic Content” buttons. These should stay the same unless you want to change any information to every event.
The required/optional attendees have a required format in Power Automate:
Email1@example.com; Email2@example.comIf you don’t need anything fancy, you can hardcode these email addresses in (Do not use quotation marks). While hardcoding isn’t always recommended, email addresses don’t typically change once they’ve been created and you can always update this later. View the image below to see what this will look like!
There you have it! This will automatically update the event and send your attendees an email invite!
Pt. 2 – Leveraging a SharePoint List
While this is great if you have the exact same attendees for every single event, it might get more complex. Let’s build off of this workflow by creating a SharePoint list for it.
- Add a text column in this list named “Email Address List” that is multiple lines of text.
- Create a SharePoint list in a SharePoint site. I named mine “Directory”
- Create a column “Email Address List” that is the Type “Multiple lines of text”
- If you don’t want to have to separate the email addresses with semi colons you can always add in a People Picker column!
- Create categories in your Outlook calendar for each type of meeting based on who should go. For example, a team IT meeting will most likely have the same people every time. You can create an Outlook category called “IT” and fill out the SharePoint list item with the Email Address List for the whole team with a matching category name. This should be the same format as needed for adding the required attendees to update the Outlook calendar event
- You can rename the Title column (it will still show up as Title in Power Automate regardless) to “Category”
- Fill out your list and head back over to Power Automate.

- Right after the trigger, add the action “Get Items” to pull from this list we just created. Now we need to sort through the categories assigned to the event and match them to the corresponding list item.
With a compose action in Power Automate you can see what the output of all categories in the dynamic content is:
[
  "IT Team",
  "Green category"
]
This lets us know we need to map through this as it is an array. If you run the full categories list without mapping/going through each item you will get a type error!
2. Add the Switch action in your workflow after the Get Items action you just created.
3. You can add the “Categories Item” dynamic content to the “On” parameter space. This will automatically create a For Each action surrounding the Switch!
4. Create cases for each directory category (this is assuming only one category that is searchable in the directory will be applied at a time but not that there is only one category total). For example, if you add HR and IT categories to your event, only one will work. You can customize later!

5. Now that we have the cases set up we need a way to call the SharePoint list to get the email addresses assigned to that category. Initialize two variables outside of the For Each action named “CategoryName” and “AddressList” that are both type “String”
6. In each case in the Switch action, set this variable to the Category name as it matches the SharePoint List item title.
7. After the For Each, add the action “Get Items” to pull from the Directory list.
8. Create an Apply To Each Condition with the Get Items dynamic content “body/value” list of items as the parameter.
9. Add a condition inside of the Apply To Each and set it to the Get Items “Title”- keep in mind it will look like “items(‘Apply_to_each’)?[‘Title’]” in the text box before you add it! The operator should be set to “is equal to” and the last value it should be equal to should be the variable “CategoryName” with the quotations replaced:
replace(string(variables('CategoryName')),'"', '')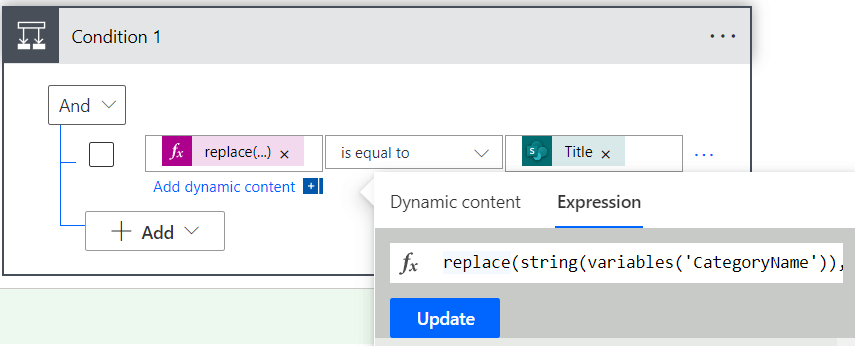
10. In the True/If Yes path of the condition, set the AddressList variable to the current item’s EmailAddressList column value. This will be found in the Get items and will display as “items(‘Apply_to_each’)?[‘EmailAddressList’]”
11. Edit the very last step, the “Update Event v4,” and add in the Required/Optional attendees parameter that new AddressList variable!
Conclusion
Now you can create events that automagically invite attendees! You can build off this and make certain categories have optional and required attendees each time as well. You can also add actions in the workflow to combine everyone from multiple categories. For example, you could have HR and IT categories and have your code compare the list so there are no repeats. I hope this helped anyone who is looking at automating their Outlook event invites! Let us know in the comments if you built off of this idea!

Leave a comment